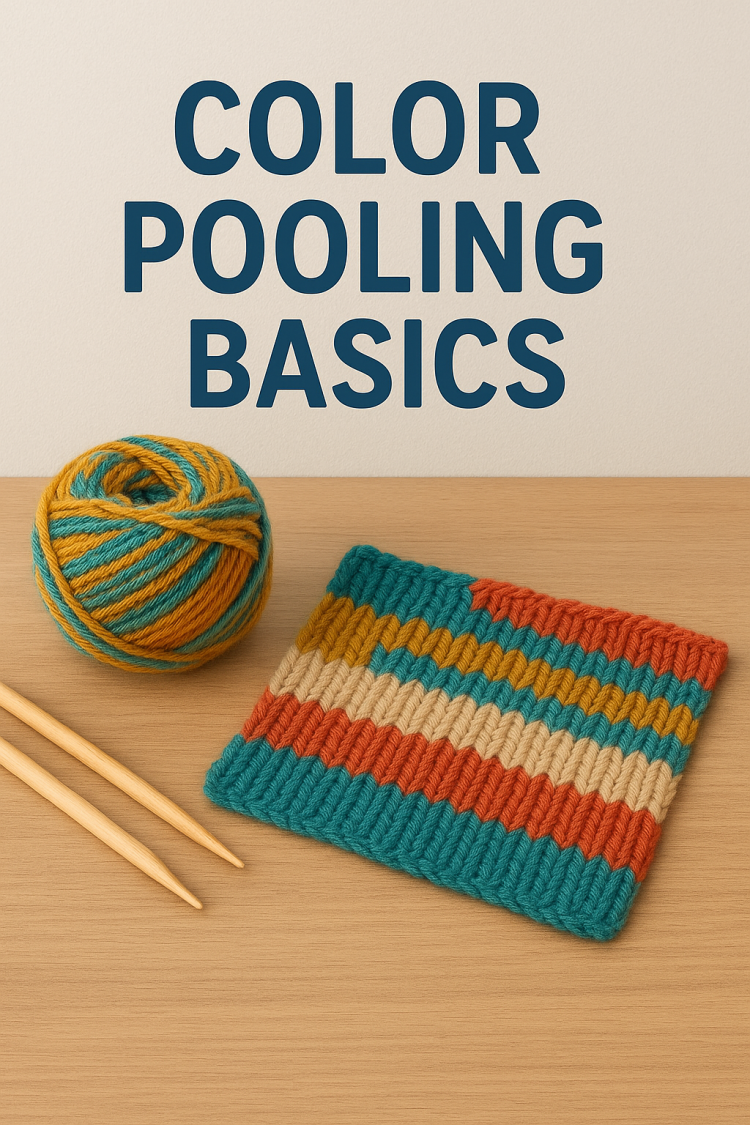
If you’ve ever wondered how someone can turn this into this, then you’re in the right place. I’ve got five key concepts to help you become a successful color pooler. This is video number one in a three part series where first we go over the basics. Fundamentals are the building blocks of fun. Comment down below if you know what movie that’s from. Now, before we start, you might be asking yourself, what does color pooling even mean? Like, why is it called color pooling or plus land pooling? It’s called that because just as water gathers in little pools after it’s raining, colors of your yarn pool together in certain sections. So on this swatch you can see the dark green has pulled together here. Then I’ve got some areas where the light green is pulling together, gathering together in those spaces.
And this is how we refer to where the colors land and gather together. So in this plant point behind me, the way that I stitched it together forced those colors to pull together like a puddle after a rainstorm. Now we’re going to talk about five concepts to help us to achieve this. Let’s dive deeper into what we’re looking for in a planned pooling yarn. I’ve got four yarns here and we’re going to discuss why they may or may not be successful yarns to choose for color pooling. Let’s start first with this lion brand ice cream yarn. Now, at first glance, I thought it had potential to color pull because you can clearly see the stripes here. You can see that this is a variegated yarn.
However, once I started working with it, I noticed that the yarn kinda is difficult to see where it transitions. The colors are twisted together in such a way that this piece is blue and white and as I pull it along, that lasts for quite some time. These color stretches are way too long to see where one ends and one begins. So if the colors are way too long in length before they get to the next color, you’re going to have a difficult time color pooling this. You would need a very large blanket and it had very large squares. So I would not recommend using this yarn or any yarn where the links of colors just go on and on and are very difficult to see where they transition. Next, I have this.
I love cotton yarn, which again I thought had the potential to color pool. And I haven’t quite given up on it just yet. But I’m going to show you why this would not be good for a beginner. I know you can see the different colors, the different Stripes. So I thought maybe it has potential. But again, where it transitions from one color to the next can be difficult to see. So, for example, in these lighter colors here, this light green you can see here, and it transitions, it kind of ombres into a light blue. And where those two colors meet kind of makes a new color, but it’s not very clear where it ends and where it begins.
So for me, it was kind of difficult to try to see where to control my colors because they transition so seamlessly, which is great and beautiful. But in color pooling, we need the color changes to be much more distinct. Now, let’s talk about this red heart striped yarn right here. This is a yarn that I did use to successfully color pool. The color changes are quite lengthy, but I found that using the granny stitch really helped with such long color changes. So, for example, here it is very clear that this is the black and this is the purple, and it changed color right there. So when I’m color pulling this, I am going to make sure that my black ends and my purple begins exactly where I need it.
Now, taking a look here at this color pooling yarn here, this caron yarn, it is very easy to see where one color ends and one color begins. So this yarn was very nice to color pool. I could easily see where one ended and one began very easily. So when you’re looking at color pulling yarn, you want to see yarns that the color changes aren’t too fast and aren’t too slow. So you don’t want really short segments of color. If this was a really short segment of color, it wouldn’t work. But because it’s long enough that I can make a stitch or two, you need at least two stitches, but two to four are good for these shorter lengths of yarn. So you need to make sure it has enough color change but not too much.
And you need to make sure that it’s distinct color changes. Concept number two deals with using the correct stitch for the kind of yarn that we’ve chosen. I’ve experimented and found success with two stitches, the granny stitch and the moss stitch. I’m going to show you guys what those stitches look like and how to use them with the yarns that we’ve chosen. Now let’s talk about the two types of stitches that I enjoy using for color pooling. I just worked up a couple of swatches here just to show the stitches for anyone who might not know what I mean when I say the granny stitch or the moss stitch. So the granny stitch is just made by Clustering together, three double crochets into the same space.
So to make another granny stitch, we would crochet one, double crochet another, and crochet a third all in that same space. Now, if I were color pooling, I would want to make sure that this cluster had all the same color. Now, this type of yarn doesn’t lend itself to the granny stitch because the color changes are so short. So, for example, in this cluster, I have white, teal, and orange. So I would not want to use the granny stitch for this type of yarn. I prefer the moss stitch for that one. Speaking of the moss stitch, let’s go over what that is. The moss stitch is very simple. It is simply a single crochet into an empty space that we create and a chain one. There it is. So, single crochet and a chain one.
Now, with the moss stitch, we would make sure that each of these little V’s that we create fall into the color that we need. So when I’m choosing the yarn to use, which stitch to use for my yarn. Excuse me, I want to use the moss stitch for my yarns that have a smaller, shorter color change. So, for example, this piece here, this orange is not very long. The purple is a little bit longer, but not that much longer. And then we have another small stretch of orange before it changes into a small stretch of blue. The moss stitch works best with these color changes because they are shorter color changes.
Now, when I have yarns that have longer color changes, like this neon stripe from Red Heart, the granny stitch works much better because it uses up more yarn in each cluster than a moss stitch does. A moss stitch is just a single and a chain, whereas the granny stitch is three clusters of double crochet. So it would make up a whole cluster of one color. So when I have longer color changes, granny stitch is best. Shorter color changes call for the moss. Now that we have our yarn and we know which stitch to use, let’s discuss the magic number. Now, the magic number is magic because that’s what makes your yarn fall the way that you need it to make your yarn pattern. Now, it’s magical to you because your magic number might be different than my magic number.
With our magic number, our gauge and our tension come into play. So this is where you’re really going to need to do your homework. This is where you might be a little bit frustrated, but if you stick with it and not give up, you’ll find your magic number and you’ll find color pulling success. Let’s talk a little bit about magic numbers. Now, the magic number may be different for you than what it was for me. The magic number depends highly on the type of hook that you use. The way that your gauge is how you crochet determines your magic number. Now, taking a look at this project pooling pattern, I used a magic number of nine. So if we take a look at this row here, going all the way down this row, you see here’s pink.
Then it changes to black, and as we keep going, it changes to this orange color. Now, let’s discuss what that means. If I start here, looking at my pink clusters, I’m going to count nine clusters. 1, 2, 3, 4, 5, 6, 7, 8, 9. I have nine fully pink clusters. In the next section, you’ll see when looking at the black, that I’m going to have nine clusters of black. 1, 2, 3, 4, 5, 6, 7, 8, 9. And then my very next cluster is that orange color. If I keep counting down the row, you’ll see 1, 2, 3, 4, 5, 6, 7, 8, 9 of the orange, then 9 of the black again, and so on in each row. So the color is changing by nine clusters every time.
But as you go along making your rows, they will land and pull together to make these beautiful squares and this beautiful plaid color. Now, I wanted to point something out to you guys that I notice as I’m looking at this. If you look very closely, you’ll notice that this cluster is just a little bit chunkier than the ones around it. The reason for that is because as I was crocheting this row, when I got to the ninth cluster, I still had pink yarn. So I had enough pink yarn to make another pink cluster. But if this one here was pink, it would not form this strong line. To make that plaid, I needed this one to be black. So what I had to do is add an extra double crochet in this one.
And I believe that one might as well to use up a little bit of that pink yarn so that as I went along, the very next one was black. Now, you might be asking about, how do you hide the transition from one color to the next? And that’s where the distinct color change comes into play in your yarn. This purple one here is hiding the transition from pink to black. I made sure that this little section of yarn that’s going to be covered by that purple is where the color changes so that there’s a distinct pink and a distinct black. Now, before I started to make this blanket, I knew that it would make this plaid squared pattern.
And I knew that each of these would have the same number of clusters per color because I took the time to look at my yarn, I unraveled the yarn all the way through the colorway and compared each section to the others. So, for example, if I were to lay these out flat, I don’t have enough room to show you in the camera, but if I were to lay these out flat, just in a single line next to each other, these purple and black would be the exact same length. I then went on to the next section of colorway, which is another black, and it’s the same length. The pink is the same length. The. The green, the orange, they’re all the same length of colorways. So I knew that each color would get the same number of stitches as I went along.
Now, in taking a look at the caron colorway, I decided to see if each of these colors were the same length. And as I looked through, I could tell right away that this white is longer than this blue section, six. So as I’m trying to figure out how many stitches to use, I’m going to know that the white is going to have more stitches than this blue. I don’t know how many yet because I haven’t worked on it with a hook yet. I haven’t tried to figure that out. But at this point, I’m studying my yarn to see what I can find out. Now, as I continue to pull the colorway around, I can see that this blue section and this orange section, they are pretty much. Let me see. Yeah, they’re about the same length.
The blue one goes just a smidge longer, but I can finagle that to where these are probably going to have the same amount of stitches. The. The purple is next. And in comparison here, the purple is longer than the orange. Let me see. In the blue, it’s longer than the blue. Let’s compare it to the white. The purple is shorter than the white. The white here goes a little bit farther than the purple. So I know I’m going to need less stitches in the purple than the white. So so far, I can tell just from looking at my yarn that the white is going to have a few stitches. The blue and the orange are going to have less stitches than that and probably the same amount of stitches.
The purple going to have less stitches than the white, but more than the blue and the orange. And then back here, the colorway starts again with the blue and the orange. Now, I do need to compare these, because even though these are both orange. These two parts of the colorway could be different numbers. Now, it just depends on how the yarn was dyed. But in this case, let’s see. In this case, you can see there, the oranges are the same length, so they’ll have the same number of stitches every time I see orange. So before you start working with your yarn to work up a swatch, you need to figure out whether you’re going to use the granny stitch or the moss stitch.
Since this colorway has short changes in colors, the moss stitch works better for me, in my opinion, because I don’t have enough to make the granny stitch. Now, I’ve already worked up quite a bit of this blanket, but I’m going to show you what I mean when I say I’m going to have the same number of stitches in these colors. I did a swatch, and I calculated that using a K6 and a half millimeter hook with this yarn, with my tension, the way that I crochet, I am going to make two moss stitches in this blue color. So according to the swatch I made is when I learned that. And we’ll talk more about that in the second part of this tutorial series. So here I have one moss stitch already, so my next one is going to need to be this light blue.
I’ve completed the stitch. There’s the single crochet and the moss stitch. Now, this next loop here needs to be the next color I’m going to be using because it forms this top part of our single crochet. Orange is my next color. This loop is orange. So with the orange, I also discovered that I would need to make two stitches in orange. Now, in the middle of that stitch, my color changed to purple. But that’s okay because this stitch here is going to be covered by the stitch that is above it in the next row. So if this color, this stitch isn’t doesn’t matter really what color it is. And that’s good that the transition happened there. So that this stitch is fully orange and the next stitch is fully purple. Now, with purple going to make three.
Now, this is just what I discovered with my own tension. And for me, the magic number for purple is three. Again, it doesn’t really matter what color that one is, because it’s going to be covered by this stitch above it. I’m back to orange. So I’m going to do two moss stitches in orange, because two is my magic number for orange. Now, next is blue. My magic number for blue is two. And now I’M on white, and I’m at the edge of my work. So for white, my magic number is four. So that means I need four moss stitches in the white. But that does include the turn. So I have to adjust my tension, make it tighter in order to turn this corner to keep that magic number. So let me show you what I mean. There’s one moss stitch for white.
Here’s two. Now, to turn, I’ve got to make two chains, and then I’ll turn my work. Now, I’ve already done two. My magic number is four, so I’m going to do two more. One. Oh, no. If you see there, I need to do two more. But that stitch is not fully white, so I didn’t keep my magic number for white. So as I go along, my stitches are going to be off kilter and not make my pattern. So what I’d have to do, this is a basic here that you’ll have to do a lot. Basic skill for planned pooling is frogging throughout your project.
So I’m going to redo those white, but I’m going to hold my attention much tighter so that my stitches are tighter, and so it uses up less yarn with the stitch so that I can have enough to make the four stitches I need and have the two that I need to chain up to make my sides nice and straight. So I’ve done two. I’ve done my chain two. And here’s the third one and a chain, and then the fourth one. That time, since I held my tension tighter, I was able to keep my magic number of four white moss stitches. 1, 2, 3, 4. Concept number four is one of the hardest ones to wrap our brains around. It has to do with our gauge.
Now, as a crocheter, we’re taught to try to make our stitches all the same size to be very consistent in how we’re working. But in color pooling, all of that is tossed out of the window in order to reach that color control. So let’s talk about it. I’m going to show you guys going around this corner one more time to further discuss our fourth key concept, which is to control the color instead of the gauge. Now, as I’m going along and my colors are landing appropriately, when I get to this white, I realized, as you saw just a moment ago, I’m not going to have enough to go around this corner. So I’ve got to tighten my grip, tighten my stitches so that I have enough of the white to go around. Now, normally that’s a big no.
We Want all of our stitches to be the same tension, so our work is nice and even. But in this case, controlling where the color lands is much more important than cover, than controlling the gauge of the stitches. I want to make sure those colors land right where they need to be in order to make these lines that I need. That I see as I look back on my work. These straight lines will only happen if I control where that color lands. Now, just as I had to tighten my gauge to come around this corner, you may find times where you have to loosen your gauge for the colors to land correctly. So here I am on orange, I should have two. So I have one and then a second one. And then with purple, I’m supposed to have three.
Now, as I finish this section, I have lots of purple left. So as I go along, if I were to make another stitch, you’ll see I’ll have a fourth stitch that is purple. 1, 2, 3, 4. So what I need to do is I need to take these back and I need to try that section again. But this time, I may need to loosen these loops as I go along. I may need to be stretching these stitches as I go along so that they’re a little bit bigger and use up a little bit more of the yarn. I hold my yarn looser, pull it up some, and there. Now, I only have three stitches in purple. 1, 2, 3. Now, they are a little looser. They are a little bigger than these other stitches.
But as I go along, when I stack the next row on top of it, as I get down and back, it will not show. The important part is that the colors are three single in purple, full purple stitches. The last key concept has to do with the hooks that we choose. Now, each yarn type has a suggested hook size, and that’s a good place to start. But depending on where your colors are falling, you may need to go up a size or down a size. Let me show you what I mean. Now, I’ve got three different sized hooks here to demonstrate what I mean by saying that you have to choose the correct hook for your tension and your magic number. Now, I’ve been demonstrating with this hook.
So during my swatch, I discovered that this is the size hook that I need for my magic number for my colors to land just right. But I did experiment with other hooks before I discovered that this is the one that will work for me. At the very beginning, when I was practicing with this hook, I discovered as I made a swatch with my moss stitch, that this hook does not control where the Yarn lands that I tightened and loosened my tension to see if I could make the stitches having one color in each stitch as I went along. Now, you’ll see here I have a blue stitch. I have a blue and white, and I have a white. And no matter what I did with this hook, I could not get the colors to land where each stitch was a single color.
So I knew that hook was not the one that I needed. So then I frogged that and got out another hook, got out a different size. This one is a 5 millimeter. Then I did a few stitches with the 5 millimeter to see if I could get the colors to land with that. Now, as I do the stitches now, I may get more than the two stitches with my blue because this is a smaller hook. However, you see here I have two blue and then a half white and half blue. So I discovered this hook might be okay. I might be able to tighten my tension to. To be able to get that to land correctly. But let me try a different hook before I commit to that one. So I then frogged again. Yeah, this is the part that’s.
You’ve got to stick with it. Don’t give up. So I got out my K hook, my six and a half millimeter, and started a swatch with that one. And I discovered that with the K hook, I can use regular tension. I don’t have to particularly hold it tight or loose. It’s just my normal regular tension. And I can make stitches that have the solid color in each stitch. So here it is. I discovered with that size hook, I can make two blue, two orange, four white. Now, I’ll admit, when I was doing this. Oh, no, wrong stitch. When I was doing this, I for a moment thought that I might have the same number of white as I did purple because those two sections are longer than the blue and the orange. So initially, I was trying to do the same size.
Excuse me, the same number of stitches for purple as white. But then I went back and I studied my yarn and I compared the purple to the white because it just wasn’t working out. And then I realized, okay, the purple is shorter than the white, so they’re not going to have the same number of stitches. So then I discovered I could have three stitches of purple and four stitches of white. So when you’re first beginning, that first swatch that you make is vital to getting it right. You’ve got to figure out which hook size you need to use, which stitch you need to use to get these stitches to be solid colored stitches. As you go along. Now that you have an understanding of the fundamentals of color pooling, let’s get going on the fun part.
Stay tuned for video number two in this three part series where we learn how to make the argyle pattern.