Step Zero: Youtube is my best friend for learning crochet
Before diving into this project, it’s important to know that YouTube is my best friend for learning crochet. I highly recommend using YouTube for learning things like the Magic Loop, Sunburst Granny Square, and the Flat Slip Stitch Join, any stitches you’re not sure how to do, or anything I didn’t think of. Here are links for videos that I like 🙂
Magic Loop: https://youtu.be/Z6rbZMSCJ7Q
Sunburst Granny Square: https://youtu.be/R3mbrXdoJns
Flat Slip Stitch Join: https://youtu.be/5u0JQckUVZc
How to tie a perfect Bow: https://youtu.be/2qSvnCux5QM
Step One: The Squares (27 total needed)
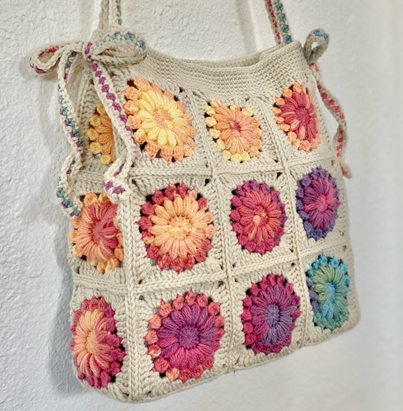
These are your typical Sunburst Granny Squares! Any square will work though. The gradient yarn does all the fun color work for you and you only have to change yarn one time instead of three.
Materials
• Rainbow or any gradient yarn in a worsted or similar weight. I used the Ice Yarns Magic Light series. (Hayfield Spirit Dupe)
• Yarn 2 in a solid color. I used the Caron One pound in the color Cream
• 3.5mm Crochet hook
• Yarn needle for weaving in ends
• One Sided Fusible Ultra Firm Stabilizer, enough make 2 rectangles that cover the area of the bottom of the bag. 3 Squares by 1 square
• Iron and Ironing board
• Sewing needle
• Thread that blends well with Yarn 2, I used white
Row 1
Start with a Magic Loop, and chain three (Counts as the first Double Crochet) then 15 DC into the loop. Pull the magic loop closed. Join with a slip stitch in the top of the first DC (Chain 3). Total 16 Double Crochets.
Row 2, Puff stitches
Chain 3
Yarn over, insert hook into same stitch as slip stitch join and pull up a loop to the height of a double crochet (3 loops on hook). Yarn over again and insert hook into the same stitch and pull up another loop (5 loops on hook). Yarn over again, insert hook into the same space and pull up another loop. (7 loops on hook). Pull yarn through all loops. Chain 1 to lock in the stitch. First puff stitch made.
Make 15 more puff stitches around the rest of the circle, each including one more yarn over the the first one:
Yarn over, insert hook into next stitch and pull up a loop to the height of a double crochet (3 loops on hook). Then yarn over again and insert hook into the same stitch and pull up another loop (5 loops on hook). Yarn over again, insert hook into the same space and pull up another loop. (7 loops on hook). Yarn over again, Insert hook into the same space and pull up another loop. (9 loops on hook) Pull yarn through all loops. Chain 1 to lock in the stitch.
At end of row 2, there will be 16 puff stitches, and 16 chains between them. Join to the top of the first stitch. (16 puff stitches and 16 chain 1’s).
Row 3, Bobbles
Chain 3
yarn over, and insert hook in the space between 2 puff stitches immediately behind the slip stitch join, yarn over and pull through 2 loops
repeat from the stars 2 more times for the first bobble, and 3 more times for every other bobble. (4 loops 1st bobble, 5 loops all others)
Yarn over and pull through all loops on hook. Chain 2 and crochet 15 more bobbles and 14 chain 2s in every space between the puff stitches.
After the last bobble, only chain one, then join with a slip stitch in the top of the first bobble. Cut yarn and Finish off. Weave in both ends with a yarn needle.
Row 4, Squaring it up
Making sure the correct side of the circle is facing you, In any chain 2 space, attach Yarn Color 2.
Chain 3 (Counts as first DC), and 2 more DC in the same space. Next space 3 Half Double Crochet(HDC). Next space 3DC. Next space 3 Treble Crochet(TC), Chain 3, 3TC.
Next space 3DC. Next space 3HDC. Next space 3DC. Next space 3TC, Chain 3, 3TC.
Repeat from stars 2 more times. Join with a slip stitch in the top of the original chain 3/Double crochet. Cut yarn and finish off. Weave in ends.
Tips
• To save time, in row 4, double crochet straight over the first tail from the end of the rainbow yarn instead of weaving it in.
• When sewing in the end of the magic loop, pull the loop completely closed, And pull the tail way through the entire circle once, and then switch backwards about and go half way around the circle, this will ensure that your circle stays closed.
Step Two: Constructing the Bag
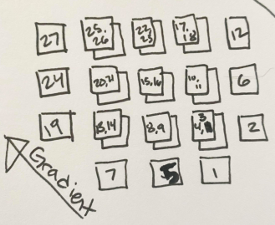
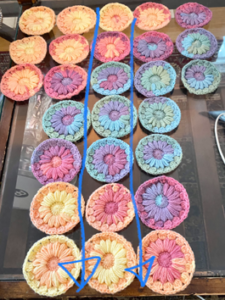
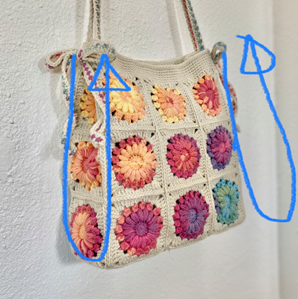
Arrange all of the squares in rainbow order, and lay them out in the order pictured below. This layout gives a diagonal gradient. This way is how I actually laid them out —>
But this way may be easier when you’re actually sewing the pieces together:
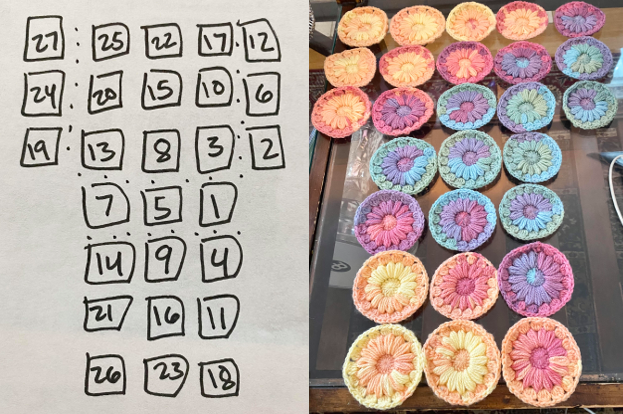
After you have your squares laid out in a way you like, double check that there are no squares too similar to each other and move squares around as needed. Then it’s time to join them together.
I chose the Flat Slip Stitch join. It’s a slip stitch in the back loops only. You can easily swap out for your favorite method of joining. The flat slip stitch join does still have a slightly raised stitch, which influenced the placement and order of the joins.
I’ve included a YouTube link for the Flat Slip Stitch that I found helpful.
The hardest part about joining the squares this way is that on one side of each square, where the last row of the square was tied off, one stitch is sometimes too small to crochet into. Either try to get a stitch in there, or go in slightly lower, or directly next to that stitch. It doesn’t really matter as long as the same amount of final stitches is the same on each square.
(Pretend these are squares)
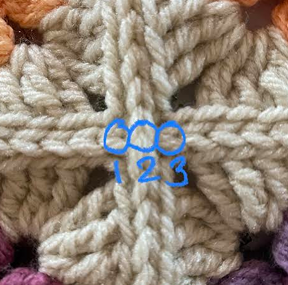
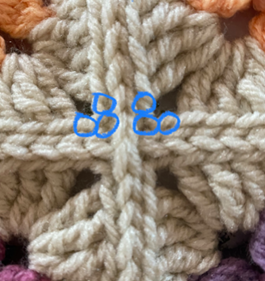
Another note, When flat slip stitching the three stitches between treble crochet groups, the first slip stitch goes through the 2 back loops of 2 squares, the 2nd slip stitch back loops of the very corner chain of all four squares, and the 3rd slip stitch goes through the last open chain on the next two squares. There should only be 3 total slip stitches between groups of 3 treble crochets.
When joining over a spot that has already been slip stitched together, chain one over that spot instead.
Here is the order to Flat Slip Stitch them together in.
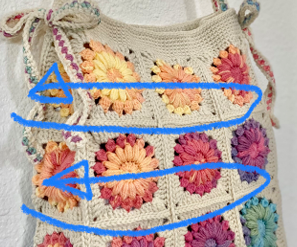
Step one is to go all the way from top to bottom in these 2 rows. —->
Be careful not to twist the squares, especially row 1 when doing row 2, and to make sure the correct side of the squares are facing you
Step Two is to do the two rows all the way around the middle of the bag. Tie the ends of each row together.
Step Three is to do both of the long sides of the bottom of the bag.
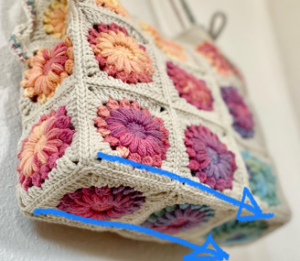
Step Four is to do the sides of the bag all the way from front to back. Making sure to match the same direction as the original two middle rows.
Weave in whatever ends need to be weaved in. Any ends on the top can just be crocheted directly over when doing the border on the top and do not need to be weaved in.
Step Three: The Top Border
The top is 7 rows of single crochet, and 4 chain three holes for the straps.
Row 1
Facing the thin side of the bag, join with a slip stitch in the top right most chain space of the top square. Chain one, single crochet into the same hole as join, and single crochet in every stitch all the way around the top of the bag, (Crocheting one into one into the corner hole, one into every Join, and one more into the following corner hole, to make a total of a group of three in those areas.)
There should be 144 Single crochets per row. To finish the row, Join with a slip stitch to the first single crochet, and chain one. (Skipping the original chain 1) (You may crochet directly over all of the top loose ends from the bag instead of weaving them in)
Row 2
1 Single crochet into the same stitch as the slip stitch, and SC 16 more stitches. Chain 3, Skip three, and then SC 49 stitches, Chain 3, Skip 3, SC 17 Stitches, Chain 3, Skip Three, SC 49 Stitches, Chain 3, Skip Three, (Also skip the slip stitch chain 1 from the row before) End the row with a slip stitch into the first single crochet, and chain 1.
Row 3
Single crochet into the same stitch as slip stitch, 1 SC in every stitch, 3 SC in every Chain 3 space. Total 144 stitches. Finish with a slip stitch into the First sc of the row, (remember to skip the slip stitch and chain one) and then chain one.
Rows 4–6
Single crochet into the same stitch as slip stitch. Sc into every stitch. 144 total stitches. Finish with a slip stitch to the first SC and chain one. (Remembering to skip the slip still chain one from the previous row.)
Row 7
Single crochet into the same stitch as slip stitch. Sc into every stitch. 144 total stitches. Finish with a slip stitch to the first SC (skipping slip stitch and chain from row before) Cut yarn, pull through to finish, and weave in ends.
Step Four: The Straps
Using your rainbow yarn, chain 231, or whatever is 4 times the width of the bag/the length of 12 granny squares plus 1. Single crochet in the back bumps all the way down the chain, cut yarn and pull through to finish, and weave in ends. Repeat a second time for the 2nd strap.
Making sure the rainbow SC row is facing the correct direction, attach yarn 2 with a slip stitch on the 3rd single crochet in. Chain 1, SC into the same stitch, and then chain 1. Skip 1 stitch, and SC into the next stitch. Continue all the way around with a SC, Chain one skip one. (I didn’t think too hard about the corners, no one’s looking that close)
When coming around the other side, make sure your single crochet are going into the exact same holes as the row before. Complete with a slip stitch into the original SC, cut yarn and weave in ends.
Pull the straps through the chan spaces from the inside of the bag, and tie some cute bows. I’ve included a link to a YouTube video about how to tie the perfect bow. The straps also naturally have a curl which is a fun bonus.
Step Five: The Structure
To make the bottom of the bag sit flat, I used some One Sided Fusible Ultra Firm Stabilizer from Joanne’s. Its basically extra extra thick iron on interfacing.
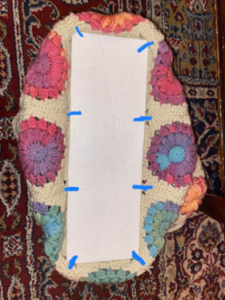
Cut out 2 rectangles that are the same size as the bottom of your bag, or 1 square by 3 squares, and iron them together. Use some scissors to round out the corners a tiny bit.
Using a sewing needle and a thread that matches your yarn, attach the 4 corners of the rectangle to the inside corners of the bag, tying off with a knot and cutting the thread short on each stitch. Then, attach where the sides of the rectangle meet the slip stitch join, 4 more spots. This is all that is needed to hold the bag secure on the bottom.
Thats it! You did it! Good job! Congrats on your new tote bag! 🎉


